Simple 4 ingredient dog treats that every dog (and cat) are sure to love!
Azul is very picky eater and his favorite treat is the treat he's never had before, so I decided to do something special for a holiday treat for Azul and some of his friends. I searched and searched looking for a recipe that met everyone's needs and when I didn't find one, I made one up. So here it is:
Sweet Sardine Surprise
- 1 can of Sardines (in water, avoid extra flavor additives)
- 1 cup of Sweet Potato (doesn't need to be exact)
- 1 egg
- 1 cup of flour (can be regular flour or a rice version for dogs who need gluten free)
My first step is to dump the sardines including the water from the can into a bowl and mash with a fork. Then add the sweet potato and keep mashing. Once those have blended, add the egg. (Egg shells are great for dogs so you could include the shell, but my picky eaters don't like the shell so I left it out.) And last but not least, stir in the flour slowly. I mix this all up until it's so thick that I can barely stir it any more with my weak hands. This should be the consistency of a thick paste not so unlike that of a meatloaf before cooking.
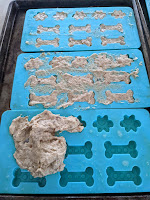
I have silicone baking trays shaped like dog bones and paw prints that we found at Walmart, but you could use any silicone mold that you have. Although my husband insisted that I didn't use any of "his" silicone as he thinks the sardine taste would never wash out. LOL, it might be worth the investment to have some dog only molds, which we do anyways due to the Gluten Free issues of some of family members.
 Lightly spray the molds with a cooking oil to prevent the treats from sticking. Then smear the meat mixture into the molds. This is a messy process as the mixture doesn't like to stick in the mold with the non-stick spray. So I start with big, dabs of the mixture dropped on the molds and push it down into the holes. I let one mold rest a bit while I fill the next mold, which is what the middle mold is doing. Then once I'm done spreading, I'll go back and gently scrape the extra on the top off with my spatula. I'm not too picky about getting every last bit of the edges because these will make nice crispy, crumbs that I can toss into my dog's meal bowl with kibble for an extra bonus.
Preheat the oven to 450 degrees and bake treats for 15 minutes at this temp. Then reduce the temp to 325 degrees and continue backing for roughly 45 minutes. This should dehydrate the treats enough that they are not filled with extra moisture making them super soft. You can bake longer for cruncher treats or shorter for softer treats.
Since Azul is so picky when it comes to treats, I've decided to keep some of these on hand in a special jar labeled Migraine Alert & Response Incentives!


.png)


No comments:
Post a Comment